Getting started
New Install
User Onboarding
Downloads
What's New in 3.0.5
Reference
Roles
Features
Interfaces
Actions
Guides
Premiere Pro
DaVinci Resolve
Final Cut Pro
Media Composer
Final Cut Pro
Welcome to your new Final Cut Pro workflow with creative.space shared storage.
Welcome to your new Final Cut Pro workflow with creative.space shared storage spaces. With version 10.3, Final Cut Pro users were given the ability to store both their Libraries and media on SMB-mounted volumes, such as those accessed from your creative.space node. By leveraging the SMB protocol, multiple editors can access, edit, and share projects and media simultaneously, facilitating a seamless workflow.
<aside>
ℹ️ SMB stands for Server Message Block, which is a network communication protocol used for sharing files, printers, and other resources between computers on a network. It allows multiple devices to access and share files stored on a central server or network-attached storage (NAS) device.
</aside>
Final Cut Pro does not provide any collaboration features outside of Library locking. This is automatic, so there is nothing custom that needs to be set up. The first user who opens a Library from the shared storage will be given write access to it. Any other user who opens it will be given read-only access, meaning they can browse and pull media from the Library, but not make any changes.
<aside>
⚠️ It's important to ensure that your network infrastructure supports the bandwidth requirements for editing video over SMB, especially when working with high-resolution media. Additionally, backing up your Final Cut Pro libraries and media regularly is essential to prevent data loss.
</aside>
If you are having issues with Final Cut Pro, check out this official resource from Apple:
If Final Cut Pro isn't working - Apple Support
Getting Started
Your creative.space system is already optimized for use with Final Cut Pro. A series of behind the scenes tweaks provide the hooks that the application is looking for. This section covers what you need to know to to integrate your shared storage into your Final Cut Pro workflow:
- Mounting - Mount creative.space to your operating system for access in Final Cut Pro.
- Library Creation - Choose a location in a shared space to store your library on, so that any user can access it.
- Modify Storage Locations - Configure the settings for your Library for where imported and generated media will be stored.
- Change Import Settings - Specify whether media will be copied or referenced where it already is.
https://vimeo.com/916127861/15e6b30da2?share=copy
Mount the shared storage
Mounting with creative.space is available through a few different methods:
-
Desktop App: Use the creative.space application to simplify mounting and access Spaces or folders as a file browser. This method is suitable for remote users with high latency.

-
Web App: On MacOS, you can simply copy a path from the web app for a space or folder and paste it into the address bar of your browser to mount and open it in Finder. You will be prompted to put in your creative.space username and password to authorize access.
-
Operating System (OS): Mount to your desktop using the SMB protocol and your specific operating system’s network mounting functionality.
Create a Library on a shared volume
If you have existing Libraries, all you need to do is drag and drop them in Finder to your mounted shared storage. This section will guide you through the process of creating new Libraries on your centralized storage:
-
Go to File > New > Library… in the top menu bar.
-
Give your new Library (.fcpbundle) a name.
<aside>
ℹ️ If you are configuring a Library for use with a Folder Structure Template, then you should use square brackets, i.e. [ ], to define variables, such as [Project Name]. Since Events in your Library are subfolders, you can put variables in their names as well.
</aside>
-
Click the ⌄ next to Where: to select a custom destination.
-
Under Locations, click on your computer’s name to see the mounted volumes listed.
<aside>
⚠️ Don’t see your computer listed?
- How to add your computer to Finder Locations
</aside>
Modify your Storage Locations
There are storage settings that are custom to each Library that are secondary to the app settings that are used across Libraries in connection to your MacOS user. When you modify these settings, they will be used only in the event that media is set to Copy to instead of Leave in place :
- Open a Library in Final Cut Pro and go to the right sidebar, which should display your
Library Properties.
- Next to
Storage Locations, click on the Modify Settings button.
- Configure the storage locations based on your workflow
Media:
-
In Library - Within the .fcpbundle, which MacOS looks at as a file even though it is a folder. If this option is chosen, then you will need to right click on the library in Finder and select Show Package Contents to reveal the subfolders and access media.

-
Choose… - Navigate to the directory your want to store media in for the Library and click Save.
Motion Content: Leave this setting as is, unless you have a specific reason to change it.Cache:
In Library - When users open the Library from the shared storage, they will also access the cache, since they are both in the same place.Choose… - Specify a dedicated location for the cache, such as a faster SSD pool, that you’ve coordinated with your team.
Backups:
Final Cut Backups - Default location for backups is in the Movies folder in your MacOS user’s home directory. This means each user will have their own backups.Choose… - Navigate to a custom location that is relative to each Library or is central across Libraries.Do not save - Don’t use the built-in backups feature and instead rely on snapshots in the web app.
Change your Import Settings
You have the option to change your import settings at the Application level, which will effect all Libraries, and also each time you import media. These will determine whether the files are copied or referenced form where they are, i.e. Leave in place.
Application Settings
- Go to
Settings… in the top menu bar
- Click on
Import in the popup
- Change
Files: to Leave files in place
- (Optional) Under
Transcode: check Create optimized media and/or Create proxy media and configure the settings based on your requirements for higher performance local and/or remote editing.
Within the Import Wizard
-
Go to File > Import > Media…

-
In the right sidebar, go to the Files sections and select the option for your workflow
Copy to - Copy imported media to the location specified in your Storage Locations. Creates multiple copies of the same media files for each Library.Leave Files in Place - Access the media from where it already is. References media files from where they already are on your shared storage.
-
(Optional) Under Transcode: check Create optimized media and/or Create proxy media and configure the settings based on your requirements for higher performance local and/or remote editing.
Media Management
Once you’ve followed the steps in the Getting Started section, you should be good to go. If you need more advanced version control, then we recommend a git-based system like PostLab.
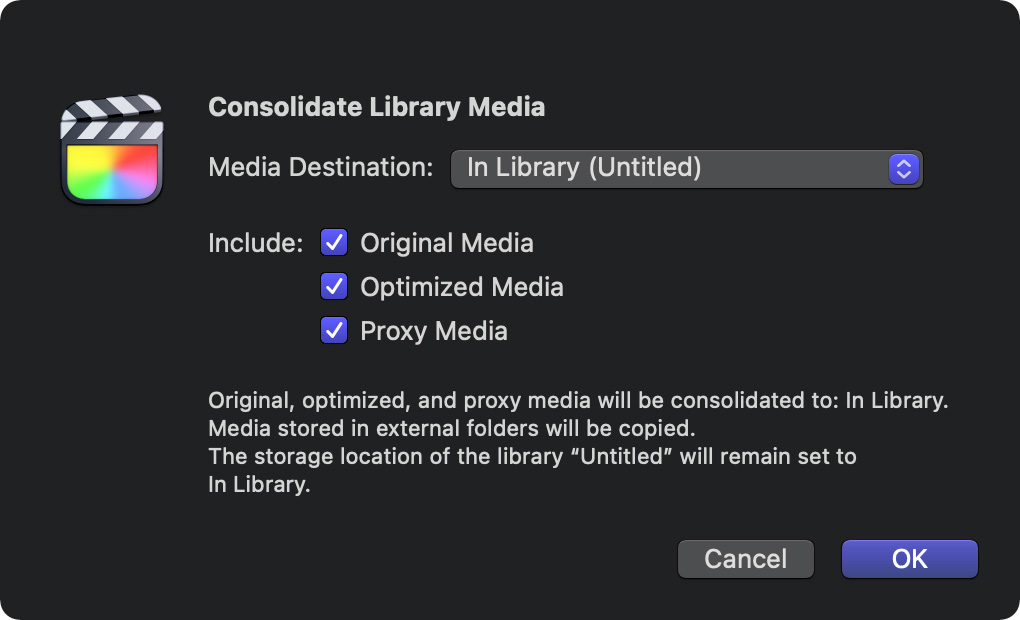
Consolidation
Sometimes you want to put all of the media files referenced by your Library in one centralized location. Final Cut Pro has a feature for this called “Consolidate Library Media”.
“In the course of creating a project, you might use media files from a variety of locations, including your local computer and external storage devices. If the media being used in a project, event, or library is located in multiple folders or on multiple storage devices, you can consolidate all the media in one location, on one storage device. This process facilitates archiving and makes it easier for others to access the media (using shared storage, for example).” (Apple Help files)
If you change the Library storage settings, it is generally a good idea to move any existing files into the new locations so that everything is in one place. That’s what Consolidate Media does.
Apple Help files state: “The Consolidate command follows these rules: